Windows 10 How Do I Stop Blue Screen of Death

The Blueish Screen of Death (BSoD) — also known as "blueish screen," "stop error," or "organisation crash" — could happen afterward a critical error occurs that Windows x is not able to handle and resolve automatically.
You will typically feel a blue screen error during the upgrade process of Windows 10, when the computer boots upwardly, or randomly when actively using the device. The most annoying part is that you'll only come across a solid blue background and a sad character face up without enough information to determine the real crusade of the trouble.
The system will brandish a message similar, "Your PC ran into a problem and needs to restart. Nosotros're just collecting some error info, so nosotros'll restart for y'all." Or general stop error codes (such as VIDEO_TDR_TIMEOUT_DETECTED, PAGE_FAULT_IN_NONPAGE_AREA, CRITICAL_PROCESS_DIED, SYSTEM_SERVICE_EXCEPTION, DPC_WATCHDOG_VIOLATION, or IRQL_NOT_LESS_OR_EQUAL). Or hexadecimal codes (such as 0x000000D1, 0x0000000A, or 0x0000007B), but they're merely hieroglyphics for regular users.
Although a stop fault does non accept a directly answer, it'south most always a problem with a quality or characteristic update for Windows ten, recently installed driver, incompatible program, or hardware-related issue.
In this Windows 10 guide, we will walk yous through the several troubleshooting steps to resolve a blue screen mistake.
- How to set blue screen error during upgrade on Windows 10
- How to set up blue screen mistake without desktop admission on Windows 10
- How to ready blue screen mistake with desktop access on Windows 10
How to fix bluish screen fault during upgrade on Windows 10
When you lot upgrade to a new version of Windows 10, a blue screen error may announced for many reasons. For example, it could event from a compatibility problem with an erstwhile plan or security software. Or it could be because of corrupted files in the current installation or damaged installation media.
Typically, when an error occurs, the setup will revert the changes to the previous installation without an explanation.
If you are dealing with errors during the installation, uninstalling not-essential apps, clearing out corrupt downloads, disconnecting non-essential peripherals, or doing a make clean install of Windows x may resolve the effect.
Uninstall incompatible app
To uninstall an app that may conflict with the Windows 10 installation, use these steps:
- Open Settings.
- Click on Apps.
- Click on Apps & features.
- Select the app that is causing bug and click the Uninstall button.
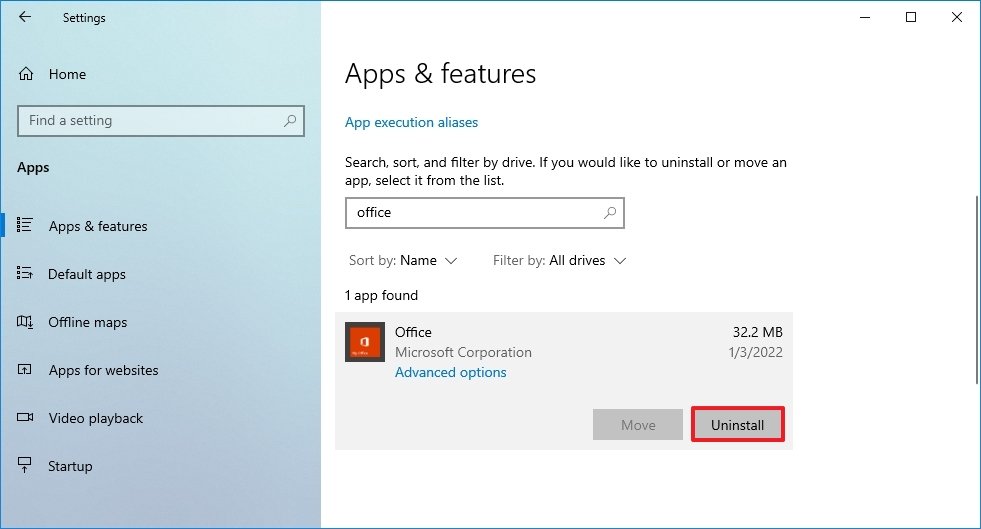
- Click the Uninstall button over again.Quick notation: If this is a archetype desktop awarding, y'all may need to keep with the on-screen directions to complete the uninstall procedure.
In one case you complete the steps, you may need to repeat the steps to uninstall boosted apps, and and so yous can try the upgrade one more time. After the update, you tin can reinstall the apps again.
Redownload installation files
Sometimes, if you use the Windows Update selection to upgrade a device, yous could meet a Blueish Screen of Death when installation files were damaged during the download process. In this case, you can employ the Settings app to articulate the previous files, assuasive the organisation to redownload the upgrade bits.
To redownload the upgrade files through Windows Update, use these steps:
- Open Settings.
- Click on System.
- Click on Storage.
- Nether the main drive section, click the Temporary files particular.
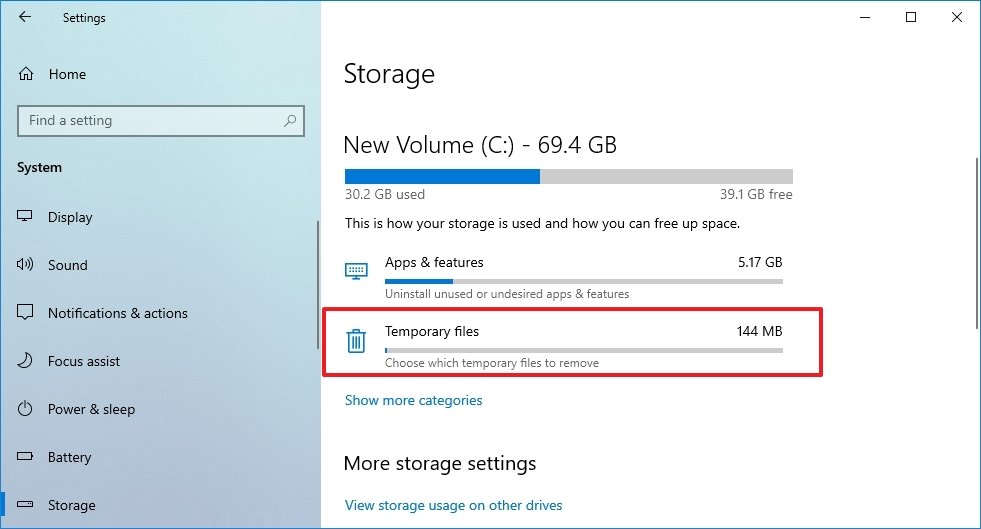
- Articulate the already selected options.
- Check the Temporary Windows installation files option.
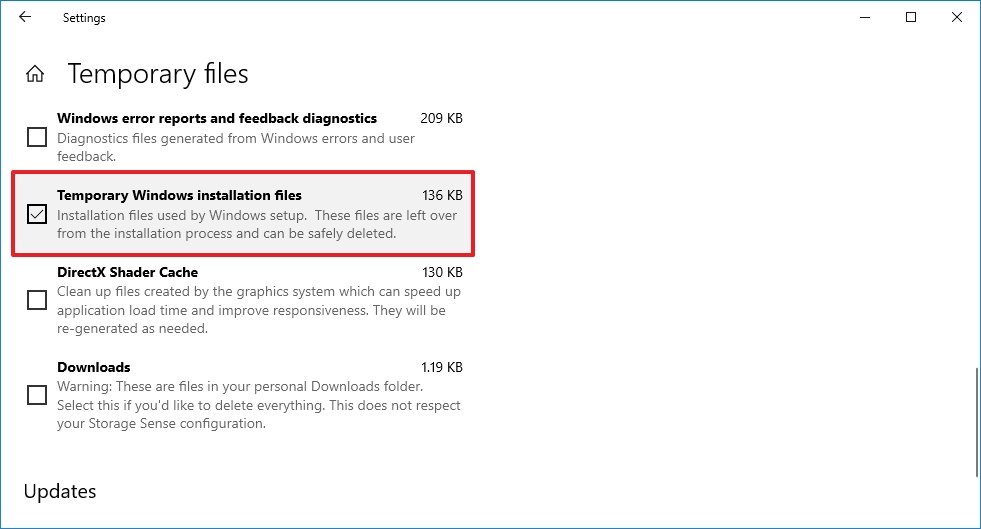
- Click the Remove files push button.
Afterwards you consummate the steps, open the Windows Update settings and proceed with the steps to upgrade the computer one more fourth dimension.
If you go along with the same problem, you should consider using the Update Assistant utility to perform an in-place upgrade. Or, if the utility does not piece of work, effort using the Media Cosmos Tool to create an installation media to install the new version of Windows 10.
Analyze upgrade problem
Alternatively, you tin as well troubleshoot blue screen errors with the "SetupDiag" tool. SetupDiag is a Microsoft tool that offers an optional download to diagnose and make up one's mind why an update or upgrade failed to utilize, which is valuable data that tin help resolve any problems.
To use SetupDiag afterward the upgrade of Windows ten failed with a blue screen, use these steps:
- Open the SetupDiag download page (opens in new tab).
- Click the Download SetupDiag button.
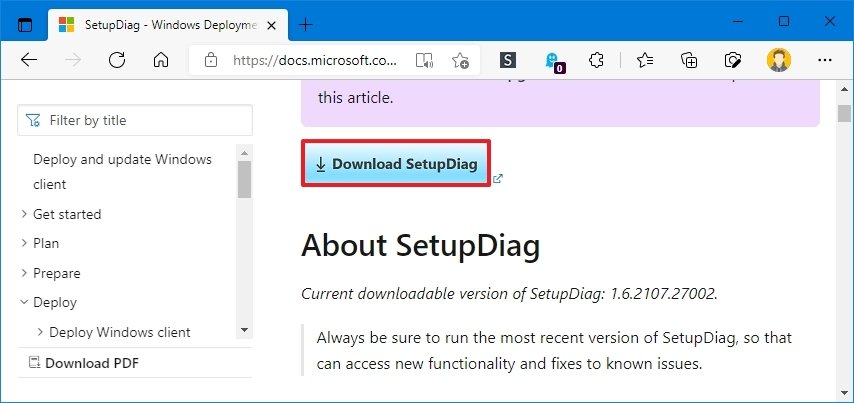
- Select a destination folder to relieve the file.
- Click the Relieve push button.
- Open File Explorer.
- Open the binder where y'all downloaded the file.
- Right-click the "SetupDiag.exe" and select the Run as ambassador option.

- Right-click the SetupDiagResults.log file and select the Open option.
Once you complete the steps, the default text editor will open the file with the diagnostic results based on the known rules.
If an mistake was detected, the logs will draw the data to determine why the device blue screened during the update, and if information technology'due south a known issue, you'll likewise go the steps to resolve it.
Sometimes you won't get any recommendations. If this happens, follow the link that might be available in the log file or use the fault lawmaking or whatever meaningful information to inquiry the trouble online. (Apply this guide for more detailed instructions.)
Disconnect non-essential peripherals
Windows can as well crash due to a hardware-related problem. As a consequence, information technology'south always recommended to disconnect all non-essential peripherals, including external hard drives, printers, secondary monitors, phones, and other USB or Bluetooth devices, before proceeding with an installation to minimize the chances of errors. The upgrade process only requires a keyboard, mouse, monitor, and cyberspace connectedness.
Later the installation, you can always reconnect the peripherals. If the outcome persists, it could exist a compatibility problem. You can usually resolve this result by downloading and installing a newer driver version from your manufacturer's support website.
If the computer uses the almost recent driver, and the problem continues, it could exist a compatibility issue with the new version of Windows x, or the hardware in question may demand to be replaced.
Y'all tin can always visit the Microsoft wellness dashboard website (opens in new tab) to review any problems available with the latest release of Windows 10.
Perform clean installation
The best mode to upgrade to a new version of Windows 10 is to erase everything and outset from scratch with a clean installation. The process will help you avert the Blue Screen of Death, and it volition help improve system functioning and resolve issues.
If y'all decide to perform a clean install, yous offset desire to ostend that the figurer can outset from USB. This means that you may need to change the boot order of the Unified Extensible Firmware Interface (UEFI) or Basic Input/Output System (BIOS) firmware to configure the correct boot order.
Typically, the steps to open the motherboard firmware settings crave pressing 1 of the function keys (F1, F2, F3, F10, or F12), the Esc key, or the Delete key equally soon as the device starts. However, these settings are e'er dissimilar per manufacturer and fifty-fifty past device model. If yous are not sure, it's all-time to check the manufacturer'due south back up website for more specific details.
While in the firmware interface, open the "Boot" page, set the boot order to start from USB, and save the new changes. Once the device tin can kickoff from the wink drive, create a bootable installation media and utilize it to outset the Windows x setup, so continue with the steps below.
To clean install Windows 10 avoiding blue screen errors, use these steps:
Warning: This is a friendly reminder that you'll be making changes to your current setup, which can cause problems and even information loss if you don't do it correctly. It'due south recommended to make a temporary total backup earlier proceeding.
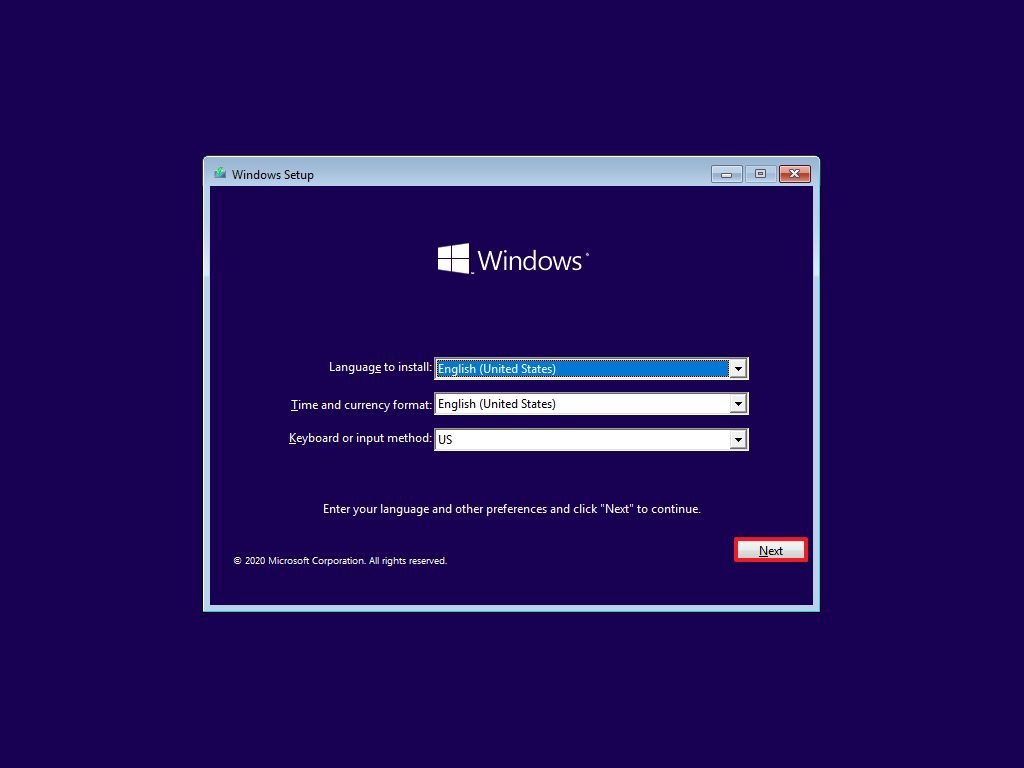
- Get-go PC with Windows 10 installation media.
- On "Windows Setup," click the Next button.
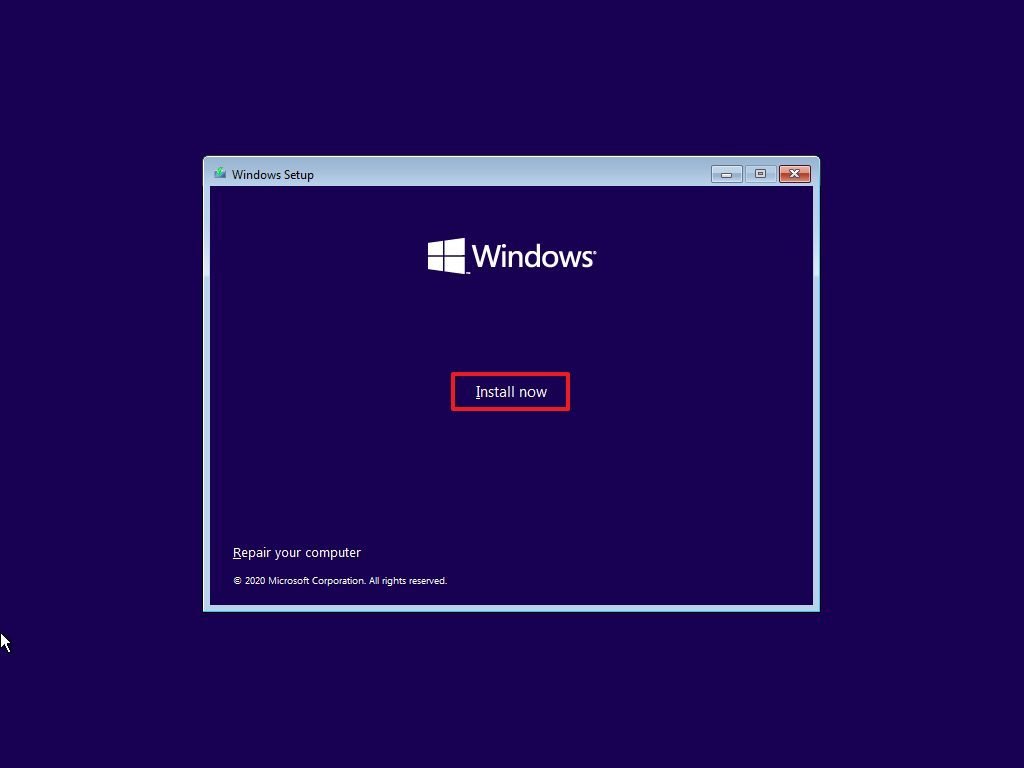
- Click the Install At present button.
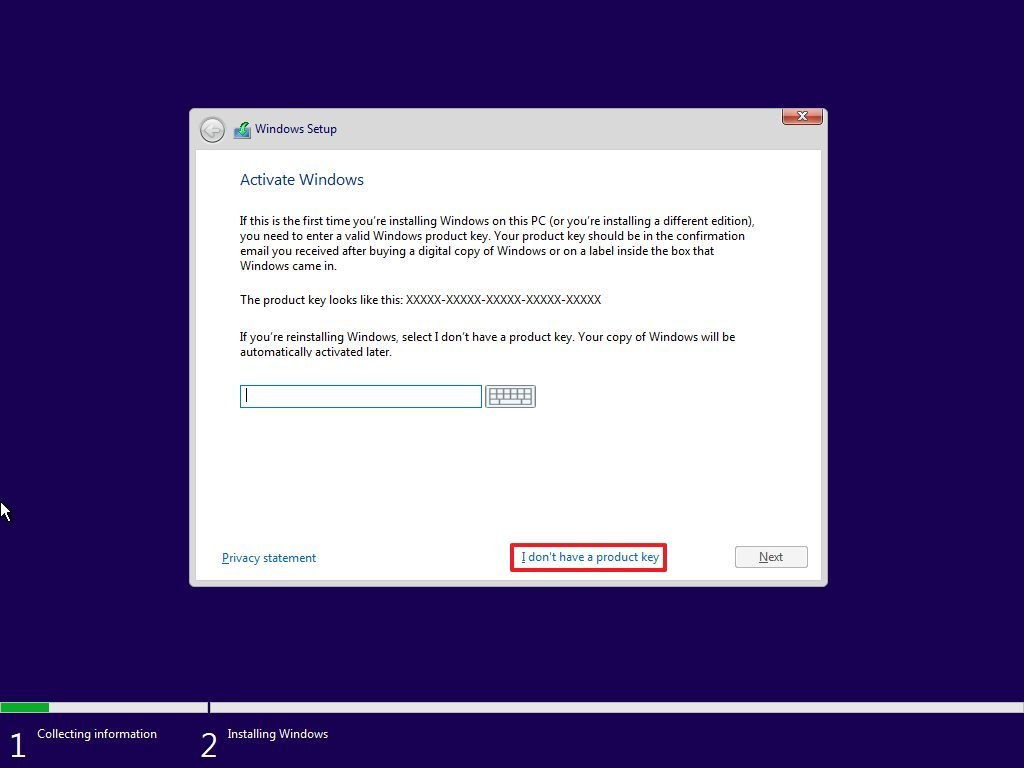
- Click the I don't accept a product fundamental choice to continue (assuming that your PC was already properly activated).
- Select the edition of Windows 10 (if applicative).Quick note: This selection must match the edition that the license activates. Otherwise, the production key won't work, and y'all may need to reinstall Windows once more.
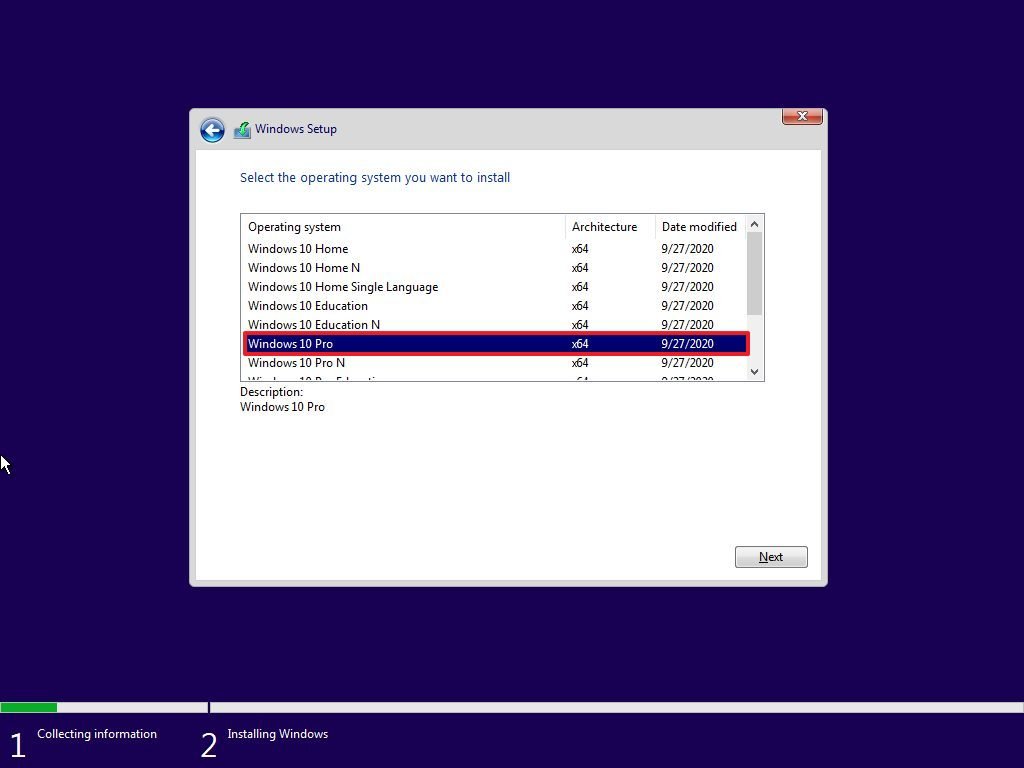
- Click the Next button.
- Check the I accept the license terms selection to continue.
- Click the Side by side button.
- Click on the Custom: Install Windows only (advanced) option.

- Select the segmentation with the current installation of Windows (usually "Drive 0"), and click the Delete push button to remove the partition from the hard drive.Quick tip: If you accept multiple partitions on the principal hard drive (Bulldoze 0), select and delete each one. The setup will recreate the required partitions automatically. You don't need to delete partitions from secondary drives to reinstall Windows x.
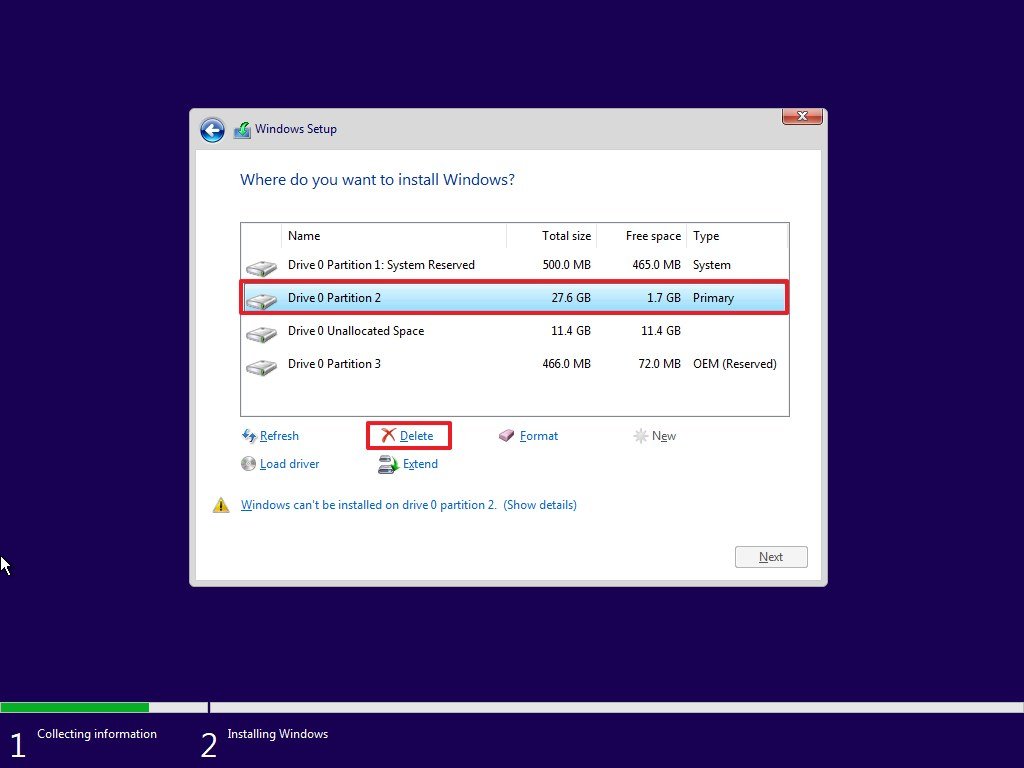
- Select the empty bulldoze labeled Drive 0 Unallocated Space.
- Click the Next button.
In one case you complete the steps, the setup will begin installing Windows 10, avoiding many bluish screen errors. Later on the installation, you'll demand to continue with the out-of-box experience (OOBE) to finish setting up the calculator by creating a new business relationship and selecting the preferred settings. Yous tin use this guide to perform a complete installation of Windows 10.
How to fix blue screen error without desktop admission on Windows 10
If the computer no longer starts correctly, you tin use some of the avant-garde system features, such as Organization Restore, Safe mode, or the Advanced startup environment to resolve the problem.
In case the error happened later on adding new hardware, consider disconnecting it to double-check to see whether the new hardware is the reason the computer is bumping into this problem.
Resolve BSoD with System Restore
Organization Restore is a legacy characteristic that allows you to undo changes without affecting your files to scroll back the computer to a previous indicate in time when Windows 10 was working correctly.
The only downside nearly this feature is that you accept to enable it manually before using information technology. If Organization Restore was previously enabled and configured, you tin use a restore bespeak to prepare the finish error.
On Windows 10, there are at least two ways to access System Restore through Advanced startup, including through the kick options bill of fare or USB installation media. (Choose one of the methods below, and continue with the steps.)
Advanced startup access from kicking
To launch the Advanced startup settings to access System Restore, apply these steps:
- Start your computer.
- As soon as the Windows logo appears, printing and hold the ability button to interrupt the boot sequence.

- Repeat steps 1 and ii two more times.
After the third interruption, Windows 10 should open up the Advanced startup environment and proceed with the steps below to access System Restore.
Advanced startup access from USB
Y'all can also use Windows 10 installation media to open the Advanced startup with these steps:
- Start your computer using USB media.Quick tip: If the computer isn't starting from USB, you'll need to alter your system'southward BIOS settings to make certain it tin boot from USB. You lot can normally access the BIOS by powering upward your device and pressing one of the function, Delete, or Esc keys, but make certain to cheque your manufacturer's back up website for more specific details.
- Click the Side by side button.
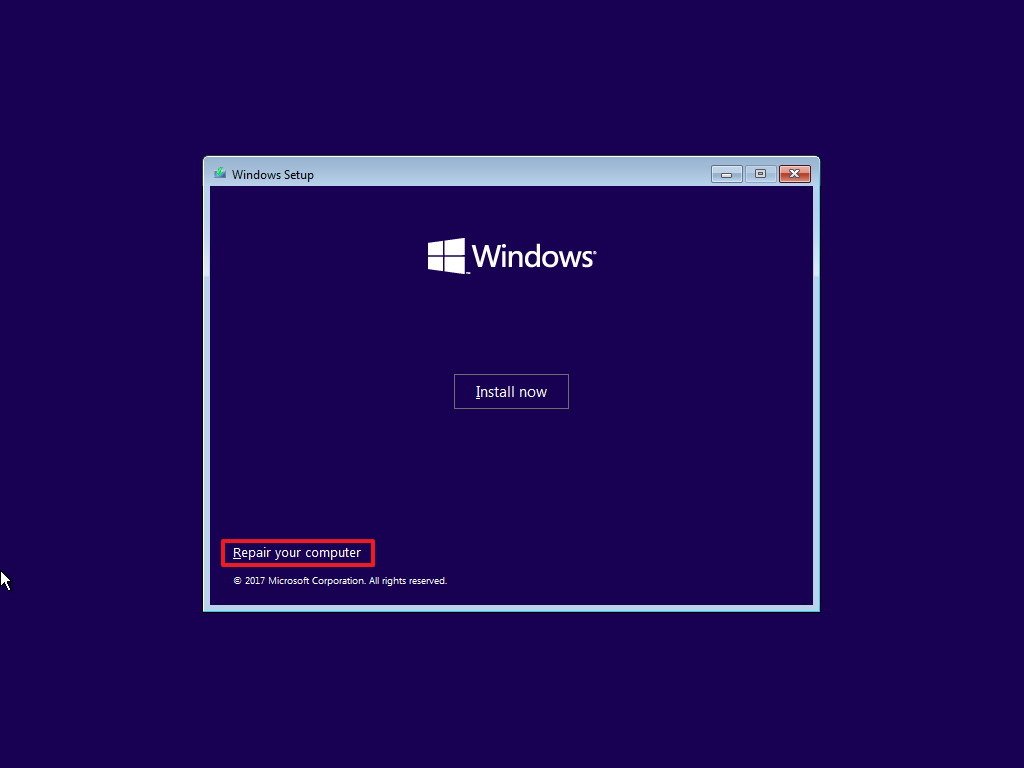
- Click the Repair your estimator choice from the bottom-left corner.
Once you consummate the steps, keep with the Restore Betoken instructions beneath.
Select Restore Point to fix issues check
To employ a Restore Indicate to gear up blue screen problems on Windows x, use these steps:
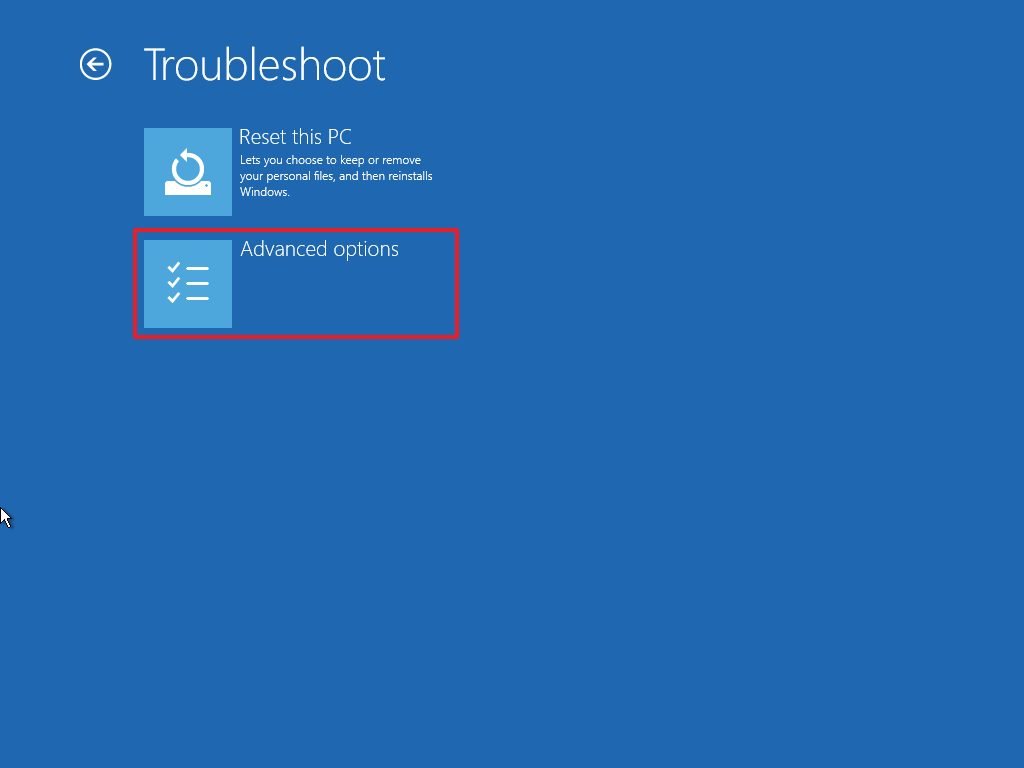
- Click the Advanced Startup option.Quick note: If accessing Advanced Startup from USB media, y'all will have the Troubleshoot option instead (see step ii).
- Click the Troubleshoot option.

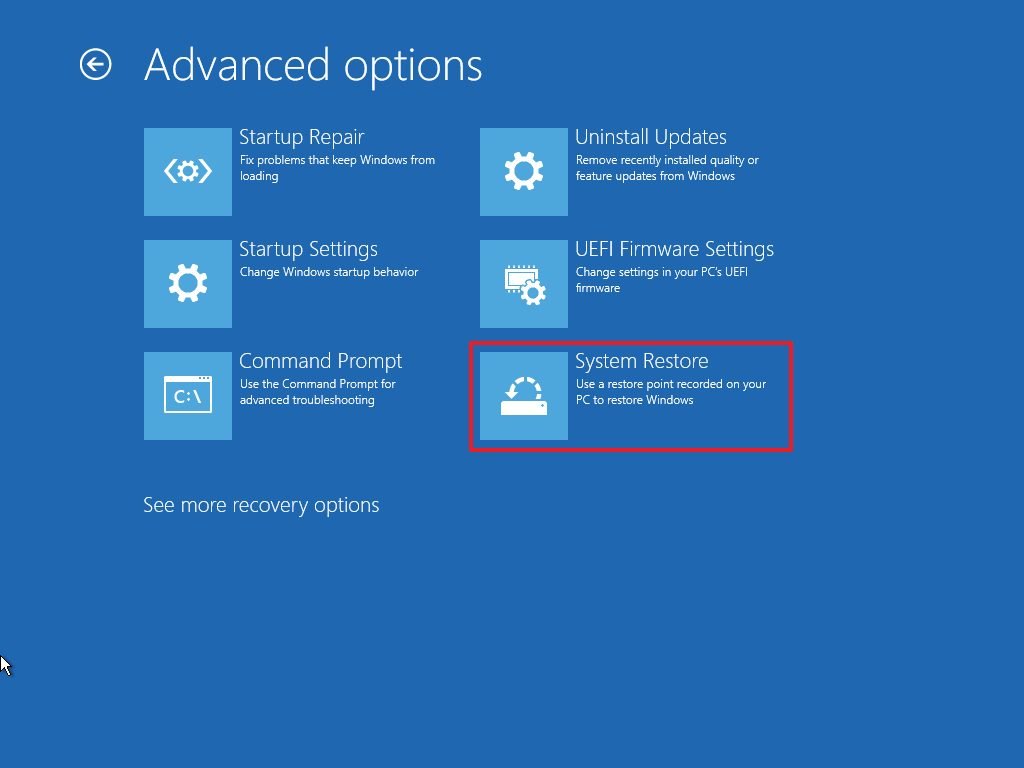
- Click the Avant-garde options button. (This step is non part of the procedure when using USB media.)
- Click the Organisation Restore choice.
- Select your business relationship.
- Confirm your business relationship countersign.
- Click the Go on button.
- Click the Next button.
- Select the most recent restore bespeak to resolve the blue screen error.

- Click the Scan for afflicted programs button to determine the apps that may be affected using a restore point.
- Click the Shut push button.
- Click the Next button.
- Click the Finish button.
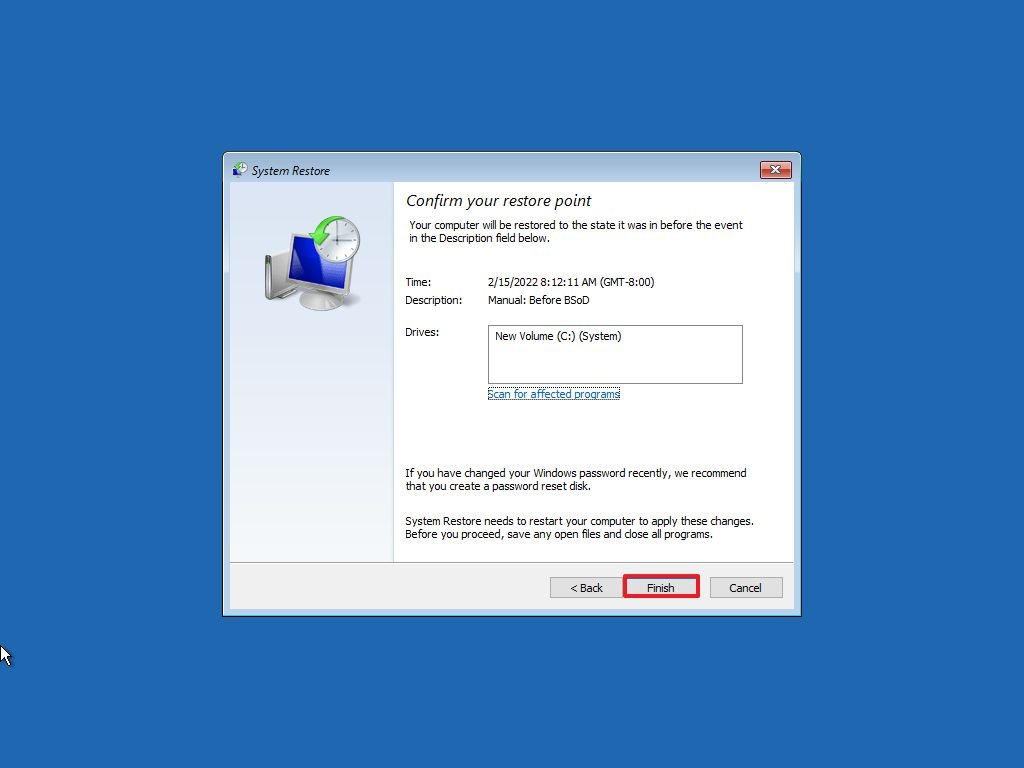
Afterwards you complete the steps, the feature volition disengage updates, drivers, apps, and organisation changes done later on the betoken of restoration was created, fixing the arrangement crashes.
Resolve BSoD with Safe mode
Windows x besides has "Safety mode," an environment that merely loads the basic drivers and services needed to access the desktop to troubleshoot whatever effect, including arrangement crashes.
You can admission Safe mode past using the Advanced startup menu during boot or past using Windows 10 installation media. (Select one of the options below, and continue with the steps.)
Advanced startup access from kicking
To access the Avant-garde startup settings to boot in Rubber fashion, use these steps:
- Start your computer.
- As presently as the Windows logo appears, press and hold the power button to interrupt the boot sequence.
- Repeat steps one and ii two more times.
After the tertiary interruption, Windows 10 should open the Advanced startup carte and keep with the steps below to admission Condom way.
Advanced startup access from USB
You can also use USB installation media to admission the Advanced startup menu to enable Safety way using these steps:
- Start your computer using USB installation media.
- Click the Side by side button.
- Click the Repair your computer choice in the lesser-left corner.
Once yous consummate the steps, continue with the Safe fashion instructions below.
Use Condom Way to fix bug cheque
To access Prophylactic manner to troubleshoot and fix Blue Screen of Expiry errors, apply these steps:
- Click the Advanced Startup choice.Quick note: If accessing Avant-garde Startup from USB media, yous volition have the Troubleshoot option instead (meet stride 2).
- Click the Troubleshoot option.
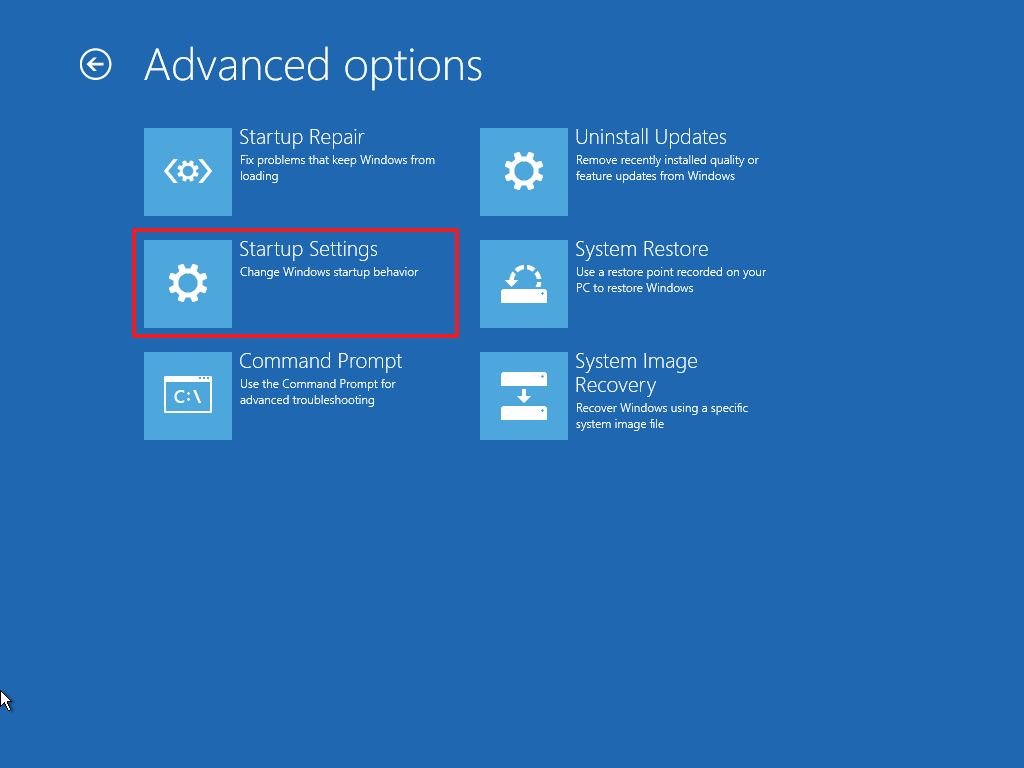
- Click on Avant-garde options. (This step is non part of the process when using USB media.)
- Click the Startup Settings selection.
- Click the Restart button.
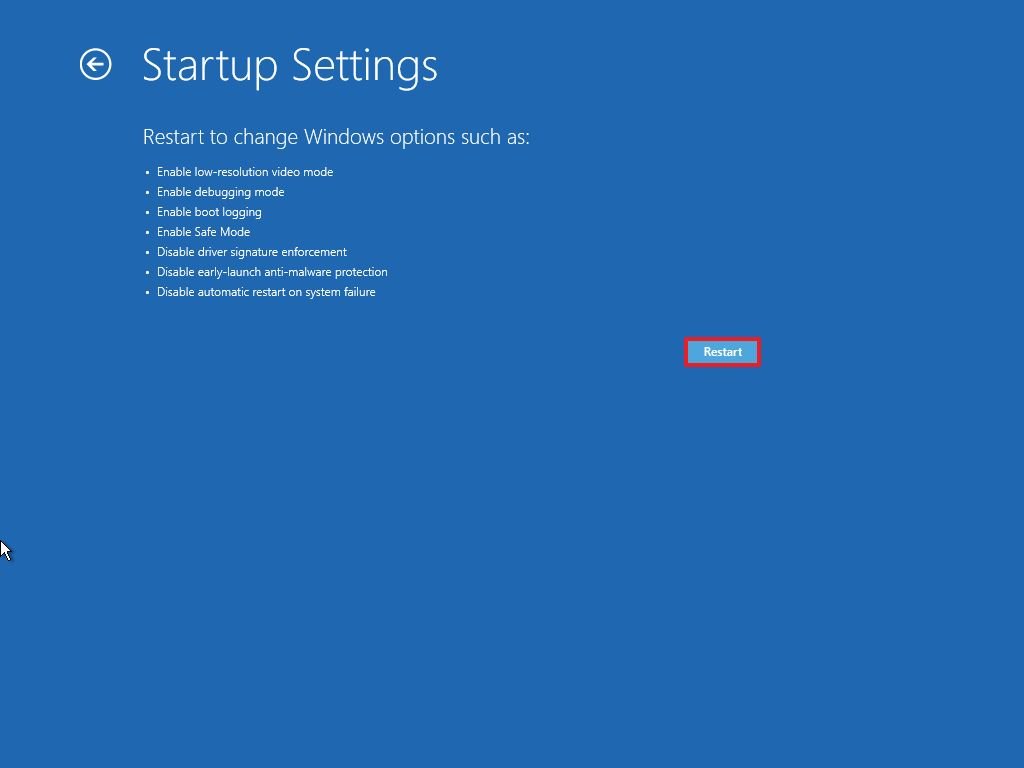
- After your computer reboots, press the F4 (or 4) key to select the Enable Safe Mode option.
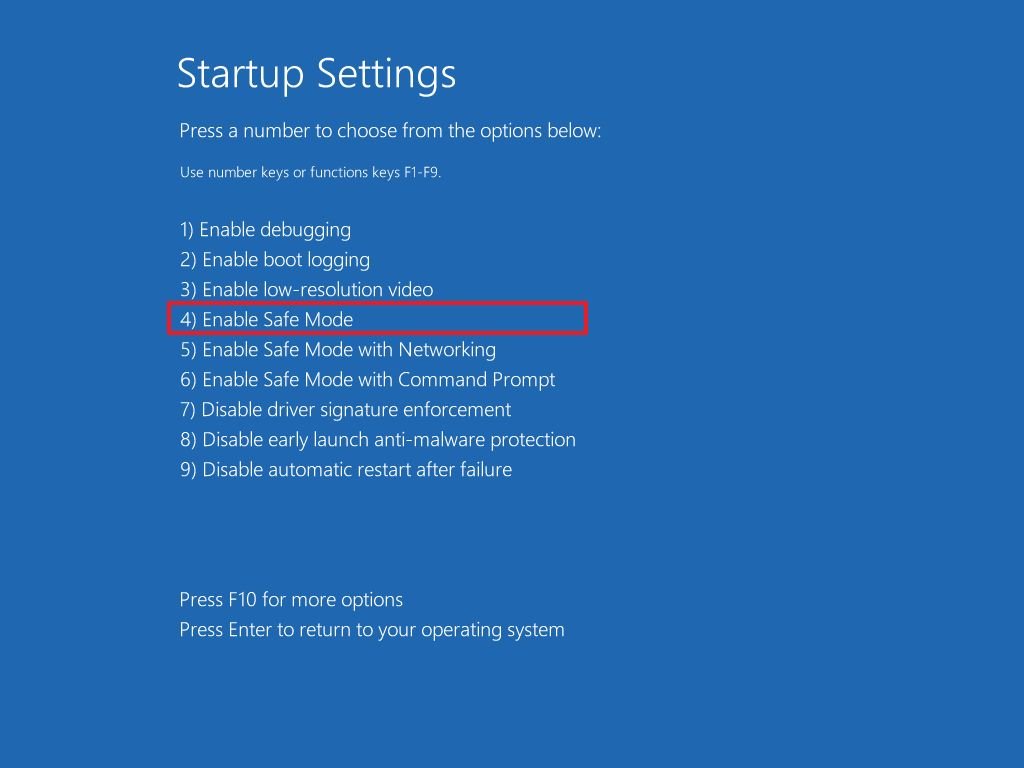
While in Safe style, you lot can use the steps below to uninstall updates and device drivers that may be causing problems.
Remove buggy system updates
To uninstall a problematic update on Windows xi, employ these steps:
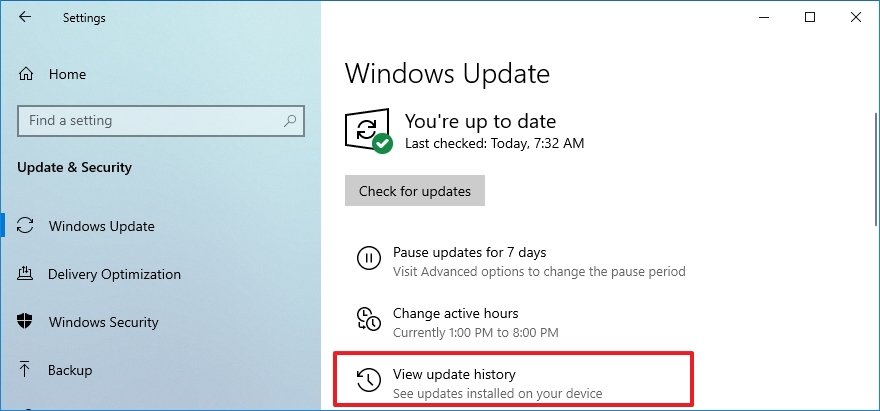
- Open Settings.
- Click on Update & Security.
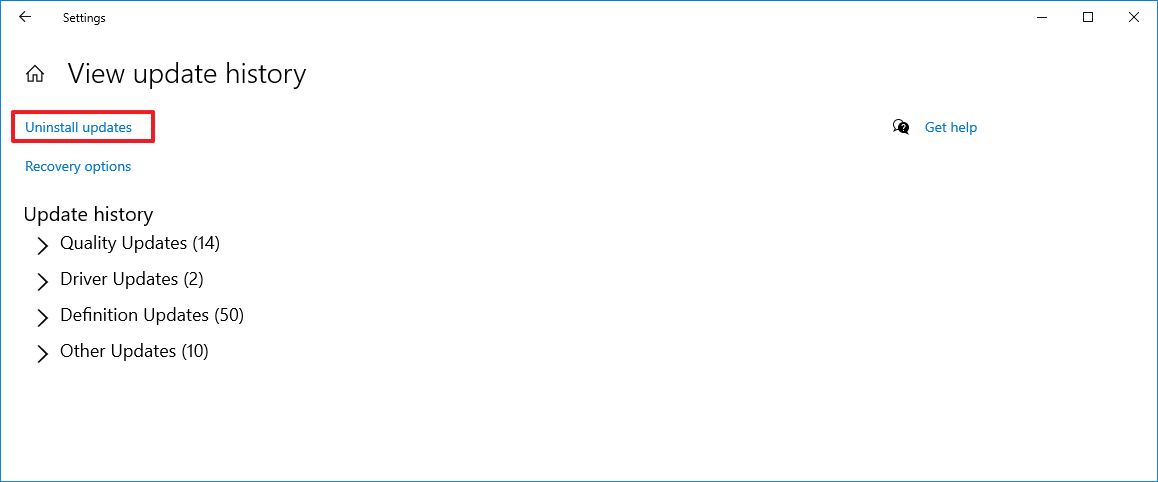
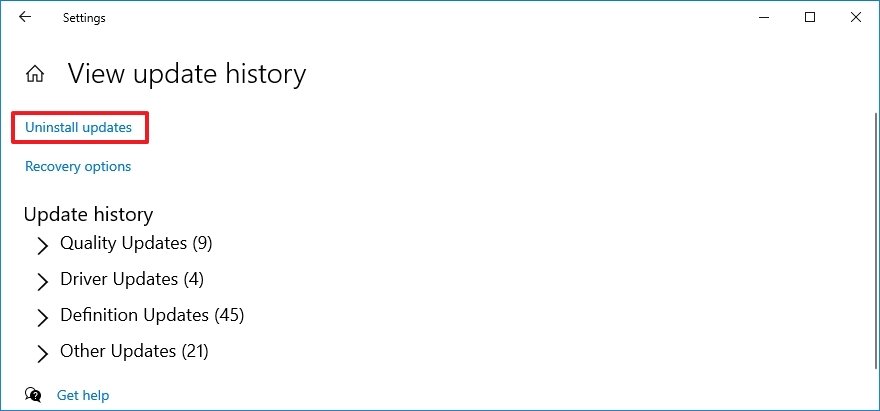
- Click the View update history pick.
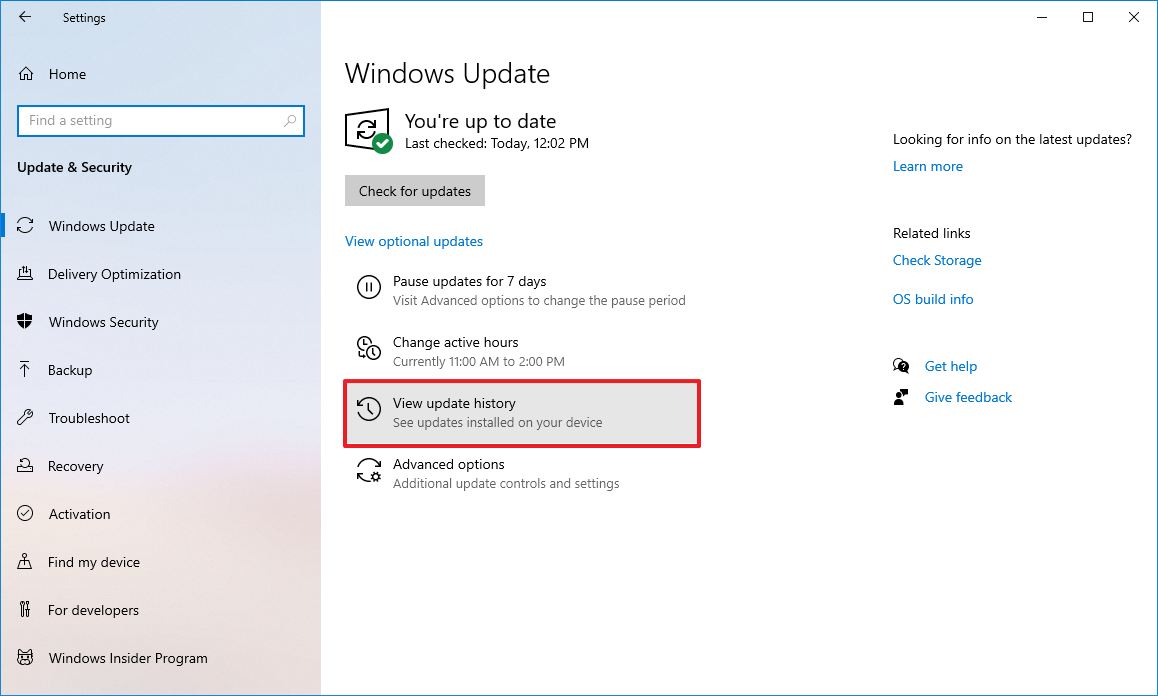
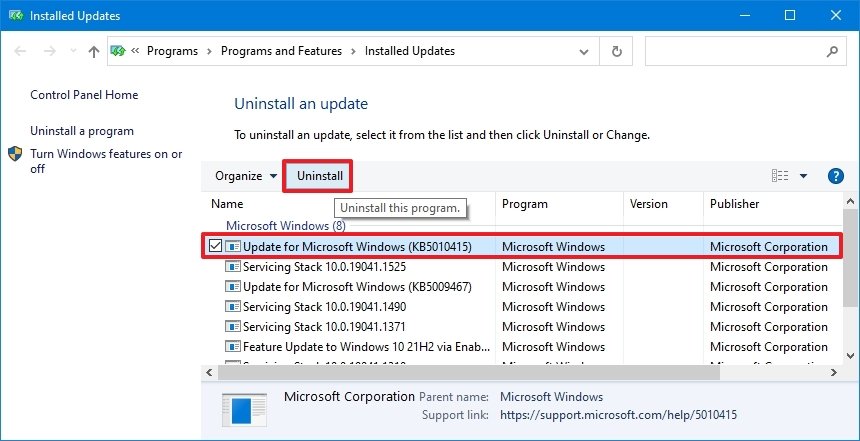
- Click the Uninstall updates selection.
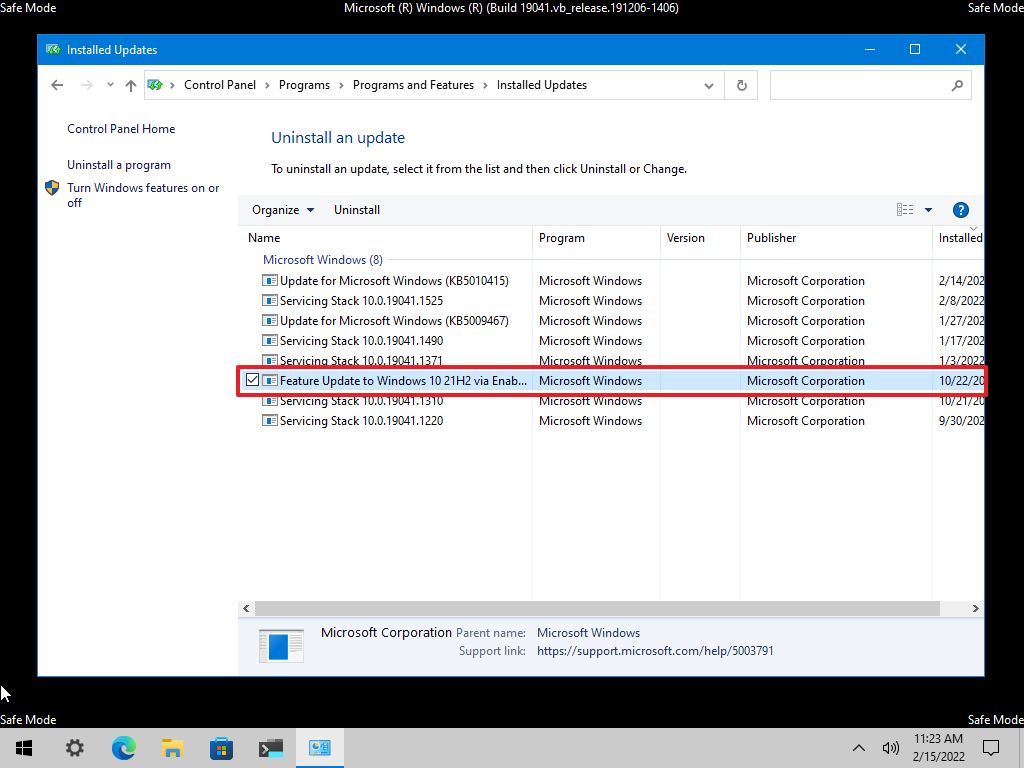
- Select the most contempo update (refer to the "Installed On" column).
- Click the Uninstall button.
Subsequently you consummate the steps, restart the device and confirm that the error is no longer happening.
Remove buggy device drivers
To uninstall an incompatible driver with Safe manner, apply these steps:
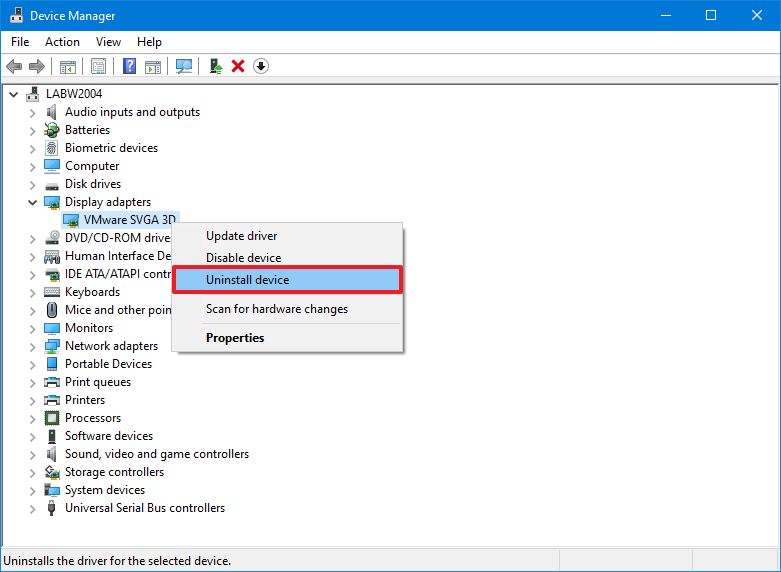
- Open Start.
- Search for Device Manager and select the top result to open up the app.
- Aggrandize the branch with the device causing the trouble.
- Right-click the device and choose the Uninstall device selection.
- Click the OK button.
In one case you consummate the steps, restart the computer and make up one's mind whether the bug check has been resolved.
If, after removing the update, the computer no longer shows a BSoB error, block the update or driver to preclude Windows 10 from reinstalling it automatically until a newer update becomes bachelor.
Troubleshoot bug cheque with Event Viewer
If you cannot see the error code during the blue screen or want more than details about the trouble, the Outcome Viewer records every hardware failure, commuter malfunction, app crash, and more than information, which yous can apply to diagnose most issues.
To troubleshoot blueish screens with the Event Viewer on Windows 10, use these steps:
- Open Start.
- Search for Effect Viewer and click the top result to open the app.
- Aggrandize the Windows Logs group.
- Correct-click the "System" category and cull the Filter Current Log pick.
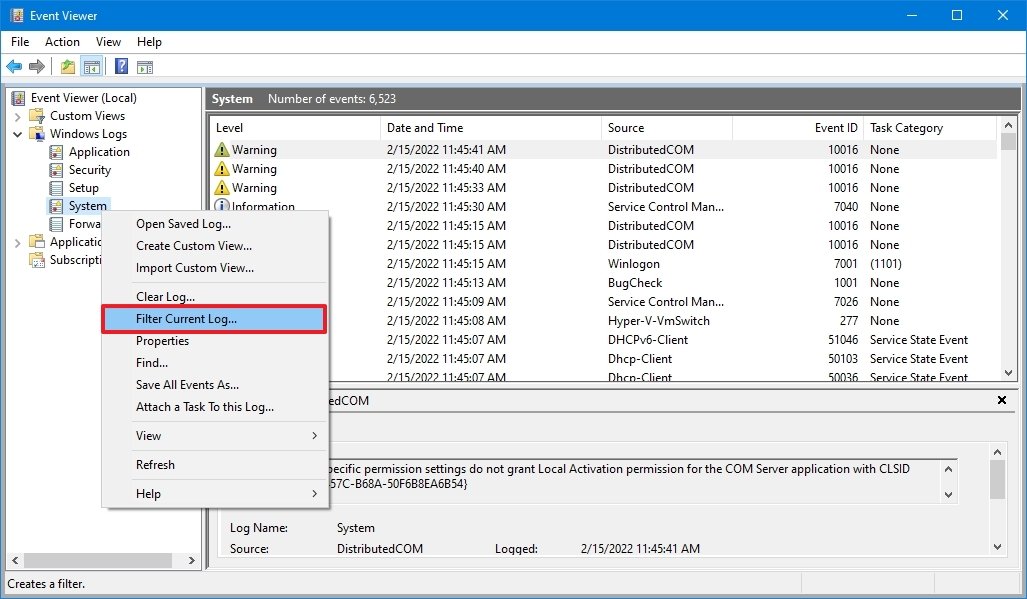
- Click the Filter tab.
- Apply the Logged drop-down carte du jour and select the time range when BSoD happened — for case, Last 12 hours.
- Nether the "Result level" section, check the Critical and Error options.
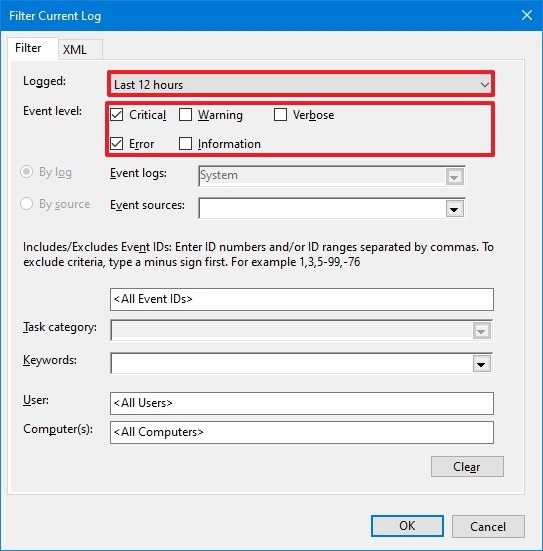
- Click the OK push button.
- Double-click to open up each log to larn more than details near the problem.

- Review consequence log details.Quick tip: When a blueish screen occurs, the system will create a memory dump file, and it'll restart the device automatically. This ways that if you accept a listing with many errors because the reckoner rebooted immediately after the bug cheque, the error causing the problem is probable to exist the one after a critical Kernel-Power event.
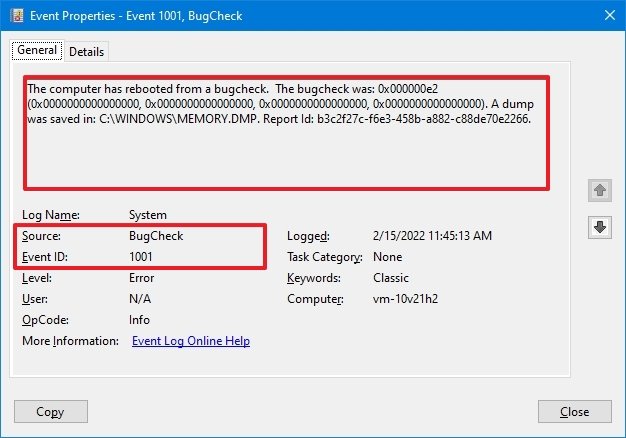
In the event log, the "General" tab includes a cursory technical description of the mistake that might give you a hint of the bluish screen problem.
In this guide, I forced a bug check using these instructions, so the consequence notes that the source of the trouble was a "bug check" that caused the computer to reboot unexpectedly. However, it's not always easy to determine the source of the issue. If y'all can't find out the reason based on the event information, copy the description, source, and effect ID and utilize it to enquiry online for a possible solution.
Resolve BSoD with Advanced startup
Windows 10 also includes a feature to uninstall problematic updates straight from the Advanced startup menu.
Select one of the options to access Advanced startup, and go on with the instructions to remove quality or feature updates causing the Blue Screen of Decease.
Advanced startup access from kick
To access the Advanced startup carte du jour with the boot option, employ these steps:
- Start your computer.
- Equally presently as the Windows logo appears, printing and hold the ability push button to interrupt the kick sequence.
- Repeat steps 1 and two ii more than times.
Later the tertiary interruption, Windows 10 should open the Advanced startup environment, and then you tin continue with the steps below to boot in Safe mode.
Avant-garde startup admission from USB
To admission the Advanced startup menu with USB installation media, utilise these steps:
- Commencement your calculator using USB media.
- Click the Adjacent button.
- Click the Repair your computer option in the bottom-left corner.
One time y'all complete the steps, proceed with the Windows 10 Prophylactic mode instructions beneath.
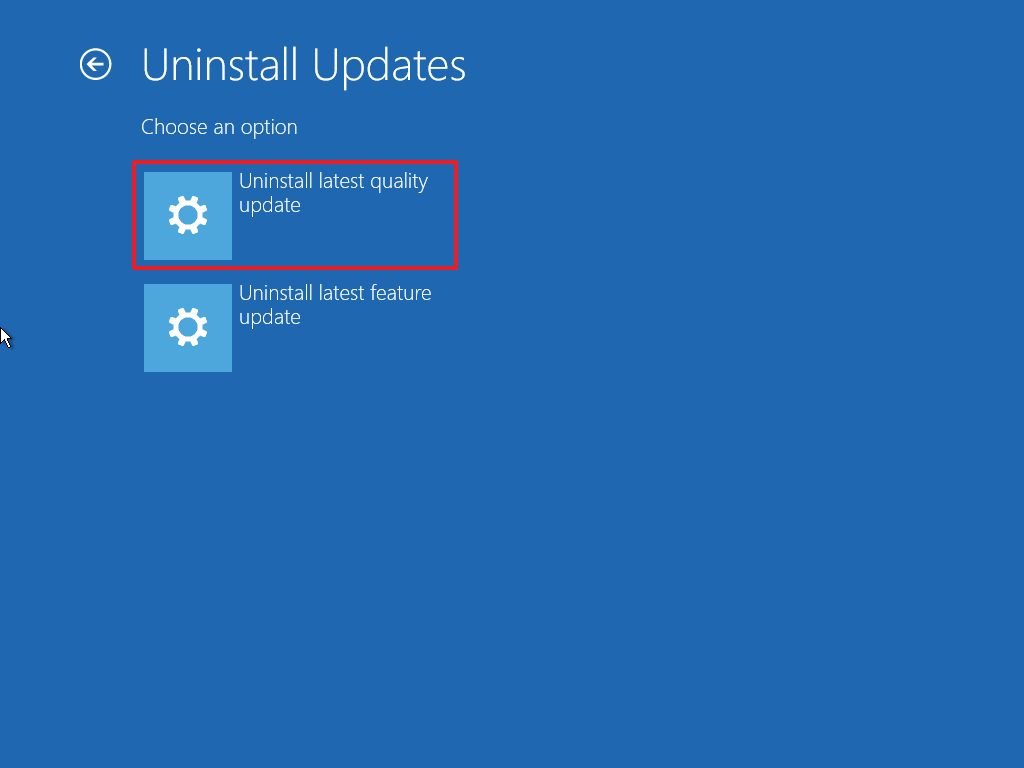
Uninstall quality or feature updates
To uninstall the near contempo quality or feature update causing the Blue Screen of Decease, use these steps:
- Click the Avant-garde Startup option.Quick note: If accessing Advanced Startup from USB media, you will have the Troubleshoot option instead (see stride 2).
- Click the Troubleshoot option.
- Click on Advanced options. (This footstep is non part of the procedure when using USB media.)
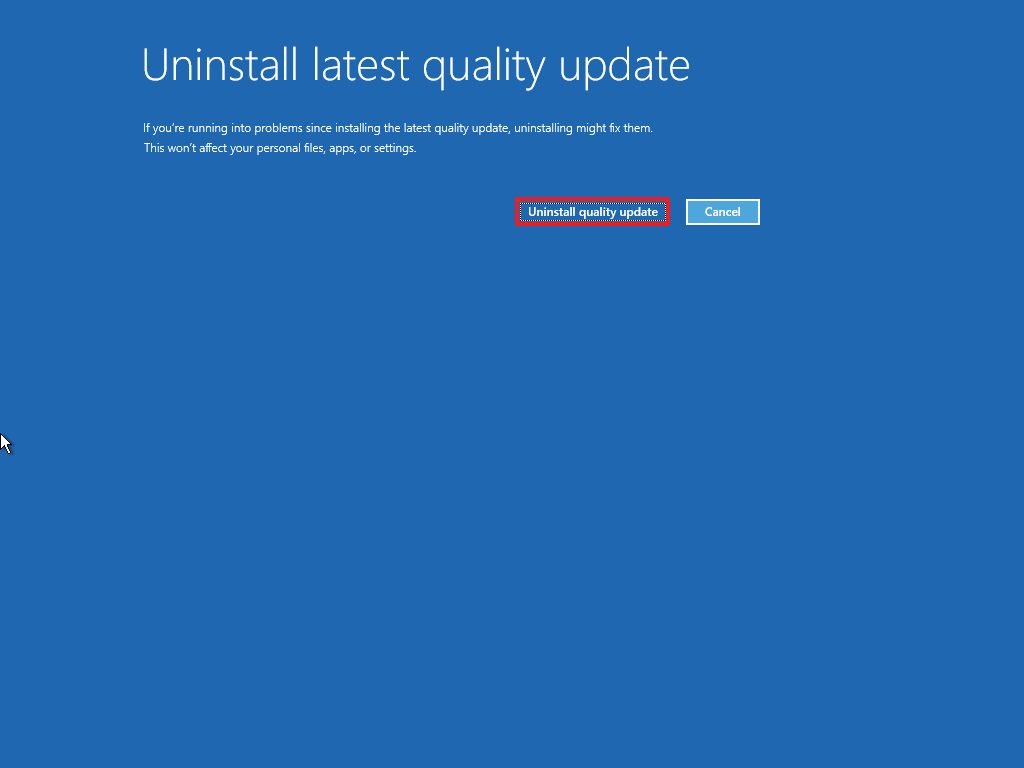
- Click the Uninstall Updates choice.

- Click the Uninstall latest quality update to remove a recent monthly update. Or click the Uninstall latest feature update pick to roll dorsum to a previous version.Quick tip: If you select the Uninstall latest characteristic update choice, you can proceed with the aforementioned steps to remove the recent upgrade of Windows 10 (equally long every bit it'south been less than x days since the installation).
- Select your user business relationship to continue.
- Ostend your account password.
- Click the Continue button.
- Click the Uninstall quality update button.
- Click the Done button.
- Click the Continue choice.
After you complete the steps, Windows 10 volition remove the most contempo cumulative update or feature update, fixing the blue screen trouble on Windows ten.
How to prepare blue screen error with desktop access on Windows 10
If you run into a Blue Screen of Death message, but you nevertheless accept admission to the desktop, the problem is usually the example of a missing system update, an issue with a specific driver, or a recently installed app.
Update Windows ten and drivers
If you have access to the desktop, installing the latest updates for Windows 10 and drivers can help cease the blue screen error.
System update
Windows 10 downloads and installs updates periodically, simply you lot may still demand to check manually to download a critical update.
To download and install updates on Windows 10, employ these steps:
- Open up Settings.
- Click on Update & Security.
- Click on Windows Update.
- Click the Cheque for updates button.
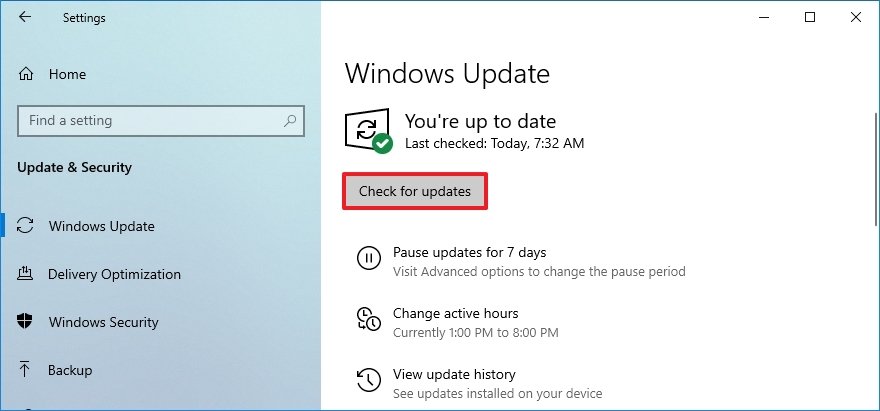
If at that place's an update available, merely it does not download, try to download and install the missing quality update manually.
Driver update
When the problem is an outdated commuter, you'll need to download and install the latest version.
To install a newer version of a driver, use these steps:
- Open Settings.
- Click on Update & Security.
- Click on Windows Update.
- Click the Check for updates push button (if applicative).
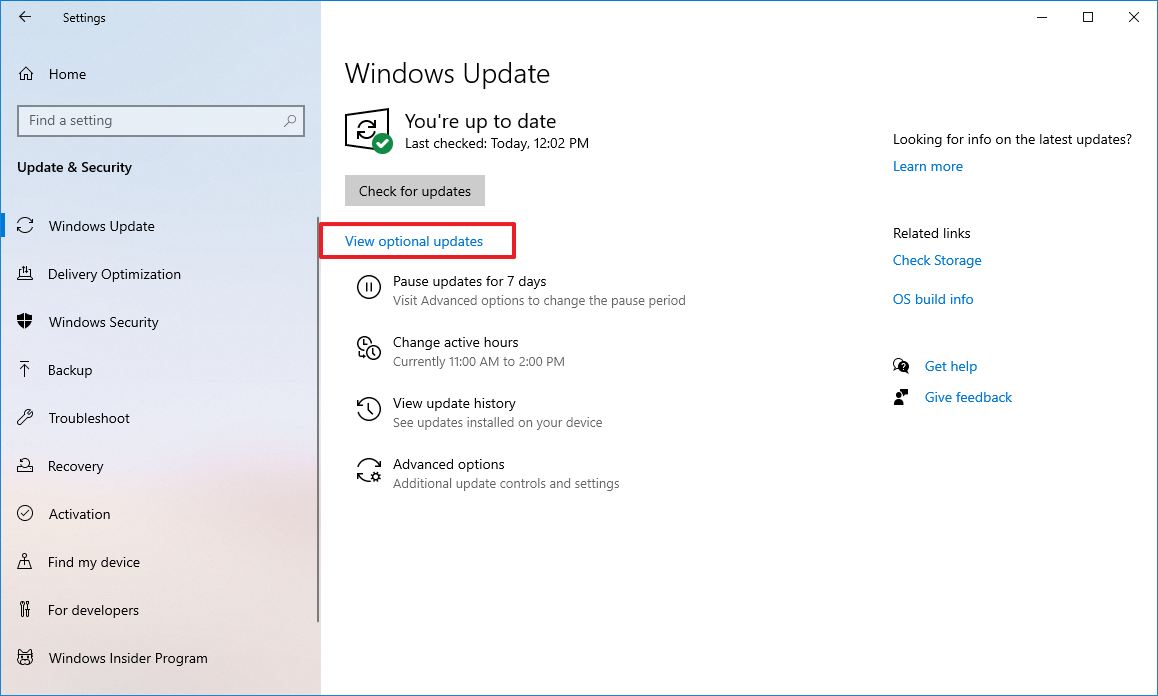
- Click the View optional updates selection.Quick tip: If the selection isn't bachelor, it means that Windows Update doesn't have any updates for your system configuration.
- Click the Driver updates tab.
- Select the driver update.
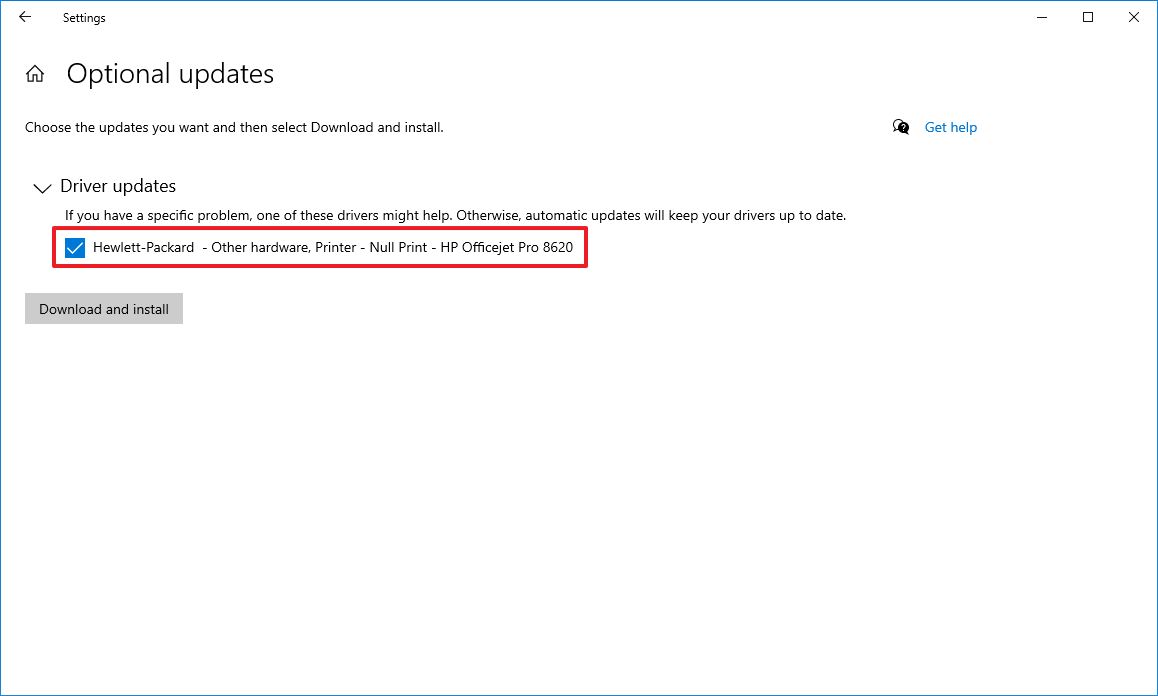
- Click the Download and install button.
One time you complete the steps, the latest version of the commuter should solve the trouble. If no updates were available, you might need to check the manufacturer'due south support website to download and install a newer driver using their instructions. If the support website doesn't have a version higher than the one yous already take, you may also desire to endeavour a beta version of the driver as it may incorporate a preview of the fix the visitor may plan to release on a future release.
Remove problematic updates, drivers, apps
Software and hardware companies tin can also release buggy updates that cause problems like BSoD on Windows 10.
Uninstall arrangement updates
To uninstall a buggy system update, apply these steps to remove it:
- Open Settings.
- Click on Update & Security.
- Click the View update history pick.
- Click the Uninstall updates selection.
- Select the most contempo update (refer to the "Installed On" column).
- Click the Uninstall button.
Afterwards you consummate the steps, the problematic update will exist uninstalled, fixing the Blue Screen of Death error. You can as well utilize these steps to preclude the Windows Update settings from trying to install the same update once again.
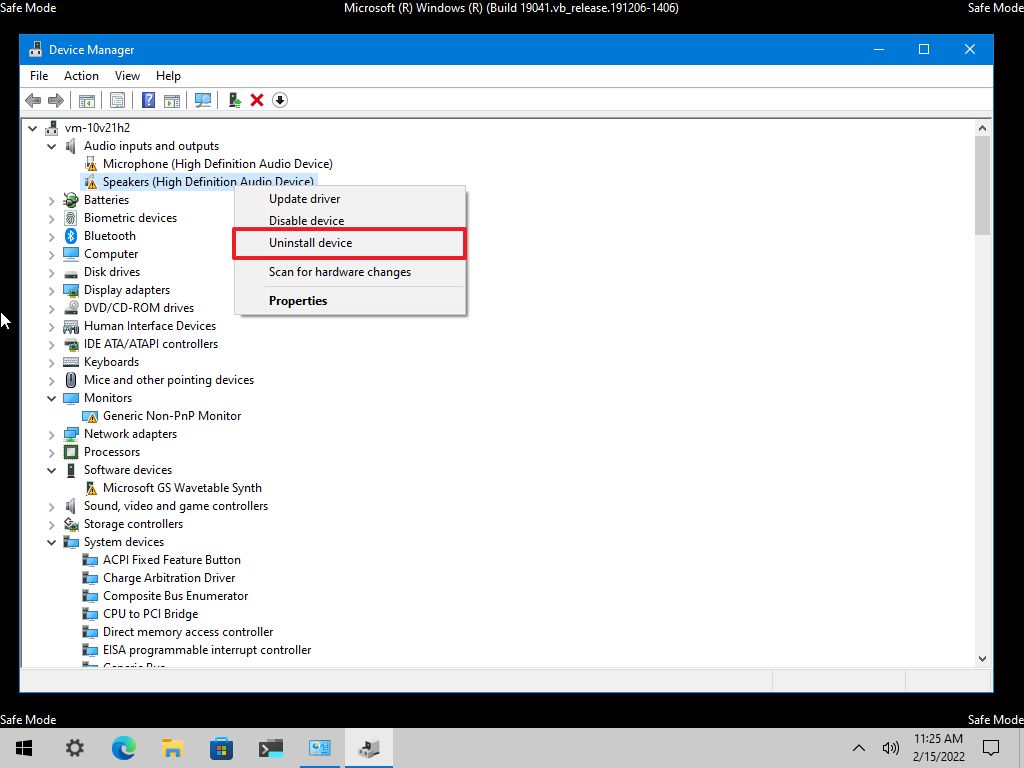
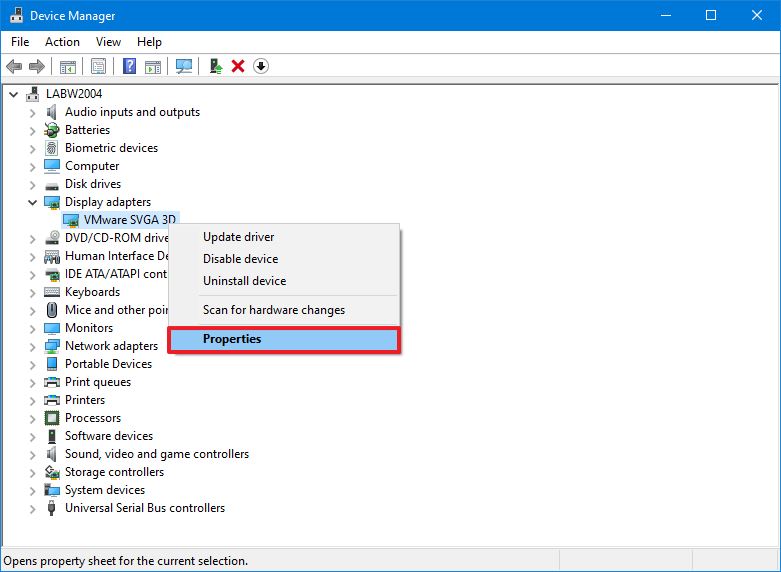
Uninstall device driver
To uninstall a buggy driver, use these steps:
- Open Start.
- Search for Device Director and click the elevation result to open the app.
- Right-click the device and select the Uninstall device option.
- Click the OK button.
In one case yous complete the steps, you should no longer see the problems check mistake on the calculator.
Curlicue back device driver
It'southward also possible to roll back the previous version of the driver to resolve the issue until another update replaces the buggy update.
To curl dorsum to a previous version of the commuter on Windows 10, use these steps:
- Open up Start.
- Search for Device Director and click the top issue to open the panel.
- Aggrandize the category of the device with the problem.
- Right-click the device and select the Backdrop option.
- Click the Commuter tab.
- Click the Roll Back Driver button (if available).Quick tip: If the option isn't bachelor, the system doesn't have a backup of the previous driver.
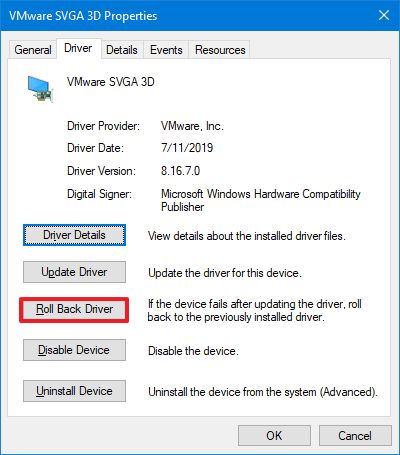
- Select one of the available options to reply the question.
- Click the Yep button.
Later on yous complete the steps, the older version of the driver will apply to the organisation, fixing the arrangement crashes.
Disable device driver
If y'all cannot curl dorsum the commuter, another workaround yous can apply involves disabling the hardware to mitigate the blue screen error until a new update becomes available to fix the consequence permanently.
To disable specific hardware on Windows 10, use these steps:
- Open up Start.
- Search for Device Manager and click the top result to open up the app.
- Expand the category of the device with the problem.
- Correct-click the device and select the Disable device selection.
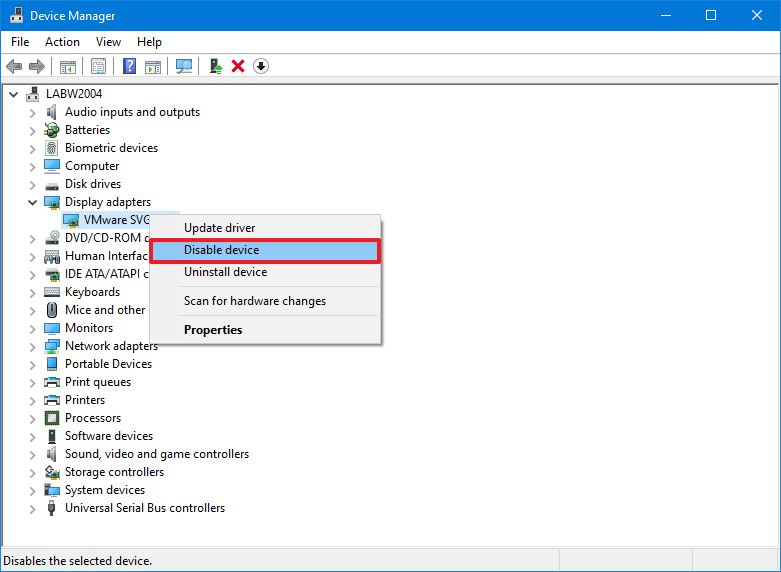
- Click the Yes push button.
One time yous complete the steps, you should no longer experience arrangement crashes.
Uninstall conflicting apps
If you have an app causing compatibility issues, the Blue Screen of Death is likely to happen randomly, or every time you launch the programme.
Y'all can get around this problem past downloading and installing the latest version of the app from the software support website. If an update isn't available, it's recommended to uninstall that program to mitigate the trouble until a permanent solution becomes available.
To uninstall a problematic app on Windows 10, utilize these steps:
- Open up Settings.
- Click on Apps.
- Click on Apps & features.
- Select the app causing the Blue Screen of Decease and click the Uninstall button.
- Click the Uninstall button once more.
- Keep with the on-screen directions (if applicable).
Once y'all complete the steps, y'all should no longer experience bluish screen mistake codes on the device.
Disconnect not-essential peripherals
On Windows 10, you may also meet a Blue Screen of Death message after connecting new hardware (for instance, graphics card, USB device, etc.). When this happens, the problem is probable because the hardware is not compatible, cleaved, or the system is attempting to install the wrong commuter.
If it'southward a compatibility issue, yous may have to contact technical support or find a compatible replacement.
It's rare, but if the organisation keeps applying the wrong driver, utilize the previous steps to uninstall and install the correct driver manually using the manufacturer'due south instructions.
When dealing with a blue screen error, you can besides use the Organisation File Checker (SFC) combined with the Deployment Servicing and Management (DISM) tool to repair damaged system files to resolve the problem.
Repair image files with DISM
To repair the locally bachelor image with DISM, use these steps:
- Open Outset.
- Search for Command Prompt, right-click the summit event, and select the Run as administrator pick.
- Type the post-obit command to repair the Windows 10 prototype and press Enter:
DISM /Online /Cleanup-Image /RestoreHealth
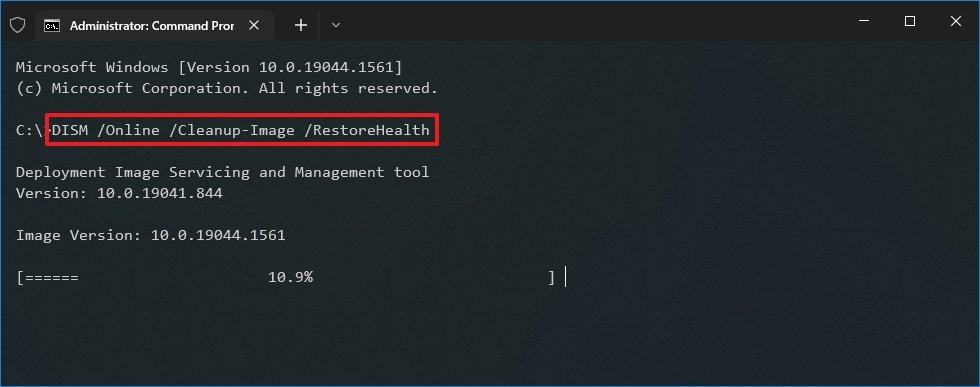
Once you complete the steps, the tool will download and replace any system file that may exist damaged in the local image of Windows x.
Repair blueish screen error with SFC
To employ the SFC control tool to repair the current setup using the local prototype (already inspected and repaired with the DISM tool), utilise these steps:
- Open Start.
- Search for Command Prompt, right-click the top result, and select the Run as administrator option.
- Blazon the following command to repair the installation of Windows ten and press Enter:
SFC /scannowQuick tip: If errors are found, you may want to run the control multiple times to ensure that everything is fixed correctly.
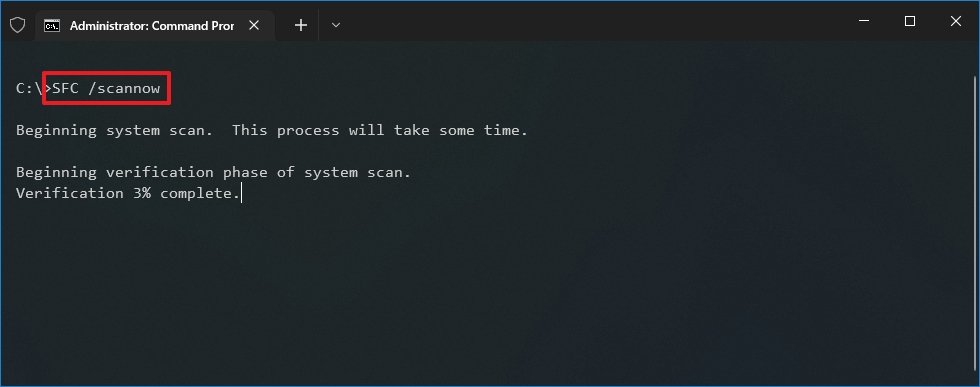
After you complete the steps, SFC will repair any system files using the local epitome files to set the blueish screen problem.
Yous tin can also refer to this guide to learn more about using the DISM and SFC tool on Windows 10.
Troubleshoot issues check with Effect Viewer
If you still can log in to your account, yous tin can as well use the Consequence Viewer to determine the reason for the trouble to observe a proper solution.
To check the event logs for hints about the Bluish Screen of Decease messages, employ these steps:
- Open Showtime.
- Search for Event Viewer and click the top consequence to open the app.
- Aggrandize the Windows Logs group.
- Correct-click the "System" category and cull the Filter Current Log option.
- Click the Filter tab.
- Utilise the Logged drop-down menu and select the time range when BSoD happened — for example, Last 12 hours.
- Nether the "Event level" department, cheque the Critical and Error options.
- Click the OK push button.
- Double-click to open each log to acquire more details well-nigh the trouble.
- Review event log details.
In the event log, the "General" tab includes a cursory technical description of the error, which might give you a hint of the bug cheque problem. If you can't determine the reason based on that information, copy the description, source, and event ID and use them to search online for a possible solution.
When you experience a bluish screen error, it'due south always a sign that a program or hardware isn't working correctly. Although in that location are a lot of troubleshooting steps you tin employ, you may notwithstanding need assistance to resolve the trouble. If y'all fabricated information technology through all our recommendations, and the problem persists, you may want to consult the Windows Key forums or the official Microsoft forums (opens in new tab). At this time, it's as well a skilful idea to contact your device manufacturer's technical back up for assistance.
Alongside the Blue Screen of Decease, yous may also encounter a black screen problem, which usually occurs because of an issue with the graphics driver, connection effect, or something in the installation. If the device experiences screen flickering issues, it'southward likely a problem with an application or video commuter.
More Windows resources
For more helpful manufactures, coverage, and answers to common questions almost Windows 10 and Windows 11, visit the following resources:
- Windows 11 on Windows Central — All you need to know
- Windows 11 help, tips, and tricks
- Windows 10 on Windows Central — All you need to know
Source: https://www.windowscentral.com/how-troubleshoot-blue-screen-errors-windows-10